Friday, November 2, 2012

Design Your Own Cross Stitch!

This one I did a while ago, but it's so easy to do I thought you guys would benefit from a simple tutorial! Cross stitch is a type of needlework, where you make continuous thread x's to make a design. As one of my nerdier friends put it, "So it's like the original pixel art!" This was my end result. The A is for Anne and the owl is because owls are cool.


 Here's a close up of the owl so you can see the stitches and back stitch around the eyes.
This is a really blanched picture, but its really clear for how many stitches I used where.

I did one for each of my roommates too - an L, and S, and another A, and they had a fish, a seal, and a yellow duck! So cute, but I forgot to get pictures! :(

Cross stitch is very easy to learn. All you need is some embroidery floss in a color you like (a think of embroidery floss is $.99 at JoAnn's and lasts a LONG time because you typically separate the 6 strands into 2 for the stitching), an embroidery needle (they are larger, not as sharp, and have a bigger eye for easier threading, yay!), and some cross stitch fabric, which you can find at JoAnn's and isn't very expensive either.

If you don't know anything about cross stitching, this site seems to be a very succinct version. Although, I have never stitched around the fabric (just cut a bigger piece than you need so you can cut off the frayed ends once you're done), and I don't use an embroidery  hoop - I just stitch with the fabric loose in my lap because the fabric doesn't need to be super taught to look good when you're done.

Making your own graph is SUPER easy. All you have to do is print this out:

And draw on it.

I swear, that's it! You have to make some judgements about what squares to stitch in when it's a curved line, but that's not a big deal, and the quality of the end result doesn't really hang on one or two misplaced stitches. I promise.

I used the custom preview on DaFont on the largest size as a reference for the letters, and googled "small owl cross stitch" for the owl or other animals I used. SUPER EASY.

The grid above is 50x60 stitches, so with 14 Aida it will turn out 3.5"x4.3" and in 18 Aida it is 2.7"x3.3". Feel free to draw outside the lines and extend the grid, or if you would like me to help you with a custom size grid, I'd be happy to help, just leave a comment or shoot me an email. Even if you go a lot outside the lines, you'll still be able to fit the finished product in a regular sized picture frame.

This was an easy craft. Drawing the grid took me around 10 minutes, and the actual stitching took me only a couple hours (keep in mind that's not a lot of time for stitching something). This was a cheap craft too, so that's definitely a bonus.

Happy crafting!
-Anne

Friday, October 26, 2012

Fox Stuffed Animal, And Many More!

My best friend is going to have a baby soon! So I made her this for her little girl:


 I think it turned out really well, and the directions were really easy to follow and do. This was literally my first stuffed animal ever. You can find the pattern here!


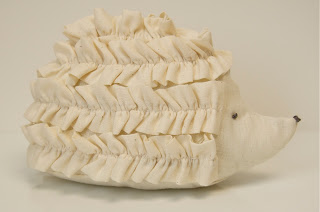
You can find the patterns and directions for this adorable ruffled hedgehog, this seahorse pillow, and this new squirrel.


This site is full of amazing crafts that you should look at if you have the time. And she also has an Etsy shop that is worth checking out too.

Happy crafting!
-Anne

Friday, October 19, 2012

Bird's Nest Charm

I'm back with my latest craft! I found this tutorial on Pinterest, and I've loved these kinds of necklaces ever since they first made their appearance. So I thought it would be so cute if I made one for each of us!
Charm Tutorial

Soooo cute! But I don't have adorable beads like that just hanging around, so I went to the local beading store and bought individual beads. They had some that were actual gemstones, so I bought those! I also ended up with 26 gauge wire from Michael's because 20 gauge looked too big to fit into the bead holes and there was no 24 gauge at the store. 

My first charm was made of Tiger's Eye, Peridot, and Moonstone:
 The second was Sodalite, Amethyst, and Moonstone:
 And the last was Dragon Vein Agate, Black Agate, and Moonstone:

I added a jump ring on top of each charm so it could be easily attached to a necklace chain. The last thing I did was make each charm a little note card with the meaning of each stone on it. It makes it more fun! Here's the one that goes with the first charm, all I did was google "Tiger's Eye Meaning" for my information.
The snowflakes are just some embellishment from my mom's Stampin' Up! stuff. In the end, this project was just about $10 for all three charms. The wire was about $4 (and I have plenty left over for more!) and all 9 of the beads came out to being around $6 (that's including the jump rings too - but you can make them out of the wire - tutorial). Of course, if you buy bigger beads then it starts to get way more expensive incredibly quickly. In retrospect, I should've gotten the bigger jump rings - I think I'm going to have to trade mine out! Time wise, I think each charm only took me 30 minutes start to finish, so it'd be a good thing to do last minute for an unexpected gift.

Happy crafting!
-Anne

Friday, October 12, 2012

Rock Owls

I was perusing pinterest, as I often do, when I came across this amazing looking craft:


...but it's not a craft. I find it horribly misleading when I find a pin in the DIY and crafts section and all it does is send me to a site to buy whatever thing I think is adorable. But then I thought, "Hey, I can do this," and went to work.

My mom is going through the owl phase, just like the rest of the fashionable world, and she loves stuff made by my sister and me. So what better Christmas gift than a family of rock owls, made by her lovely daughter? So I made her some adorable owls!

This craft was so easy and fun to do. All I did was scour my backyard for a few flat, owl shaped rocks. Some I had to kind of dig out because they had nearly become "one" with the earth. If you have a creek near your home, it would be really cool to get some river stones, and convenient, because they are typically smoothed down from all that water erosion, which makes a better painting surface. Although I have seen that people will pick out rocks and sand them down before polishing them to make them smooth, so that's always an option for the people who aren't, yanno, lazy like me.

The hard part was picking out what paint colors I wanted to use. The more colors the merrier in my family, but the pallet we have only has spaces for eight colors, so I had to limit myself just this once. I used acrylic paints because that's just what we have lying around from other projects, but I'm sure that you can use any type of permanent paint out there.

To apply the paint, I figured that a regular paint brush would make too big of blops on my rather small rocks, so I ended up using a separate toothpick for each color. It worked perfectly, but there is a lot of time spent on reapplying paint to the toothpick because it just doesn't have any capacity to hold paint. It was a small price to pay for such a cute outcome. I really liked that each of the owls from the etsy shop had hearts incorporated in their design, so I made sure to put a heart on each of my owls. My lines are not as crisp as the ones from the store, nor are my owls as detailed, but I am all the same, satisfied. In fact, I love the colors! And now that I'm done I have a sneaking suspicion that the etsy shop owner used a pen for their designs.

Once the paint was dry I put a clear varnish on top just to make them look shiny and seal in the paint. We do not like chipped paint! Once the varnish was dry I wrapped  them in tissue paper and they are all ready as stocking stuffers for my mom! That's one gift marked off my list.

Total effort put into this project was probably around 2 hours. But adding in the drying time it was more like 5 or 6 hours. The stress level of this project was nill. I put down some plastic on our coffee table and painted while I watched TV. I felt like I just had a little day to myself.

Oh, and then there was this little guy:
Poor thing was messed up, and a frustrated Anne wiped off what paint was still wet on him. He was the littlest of the rocks. Maybe I'll finish him up tomorrow. I just feel bad leaving him so....dead looking. It's really sad.

Happy crafting! If you have any questions feel free to ask.
<>Anne

Let's Get Started!

I have been doing WAY too many crafts lately with all this free time I have. Taking only 12 credits in one semester is very underwhelming.

Some of the crafts I make are based on other tutorials, which I will link to, and some I create on my own with the inspiration from other sites, which I will also link to. Remember, its good to give credit where credit it due!

I can't guarantee any regular scheduling for when I post my latest creation, because I can't guarantee that my classes won't be taking up my time for a week or so, or that the crafts will take a short amount of time.

Without any further ado, may the crafting begin!

Enjoy,
Anne